Android Parcel Mismatch系列漏洞整理(二)

Brief

在上一篇BLOG中, 讨论了Parcel Mismatch系列漏洞的产生原理,并解读了其中一种典型的利用场景 self-changing Bundle 的利用流程以及Android 13中的缓解方案。在这种攻击模型中攻击者可以控制Bundle对象中读取到的内容,但是想要完成如LaunchAnyWhere的实际攻击效果,仍需要配合system_app/Framework中其他的正常功能逻辑。

而michalbednarski在21年初公开了一种全新的攻击模型:利用Parcel Mismatch来劫持四大组件启动流程中的关键参数,向任意一个APP中注入攻击者的dex,达到提权效果以及任意代码执行。

在Android 13的Safer Parcel改造中,同样对这种攻击模型发布了对应的漏洞缓解方案。在Android 13之后的系统中,这种攻击模型同样很难再生效。

下面的篇幅将通过michalbednarski/ReparcelBug2来详细解读这种攻击模型,想要深入理解,建议看下Github上这个项目的README。

复现环境的搭建

由于该漏洞是在Android 12 Developer Preview 3版本是上被发现的,并在Android 12 release中就已经完成了修复,因此搭建漏洞环境也花了一些精力。下面是一个可以用于漏洞复现的Pixel 3XL ROM

https://dl.google.com/developers/android/sc/images/factory/crosshatch-spp3.210325.010-factory-3f4a9d89.zip

笔者实测可以配合ReparcelBug2来完成system任意命令执行,但是需要重新简单调整下Parcel的布局。

攻击流程及原理

Broadcast Receiver 组件启动流程与劫持

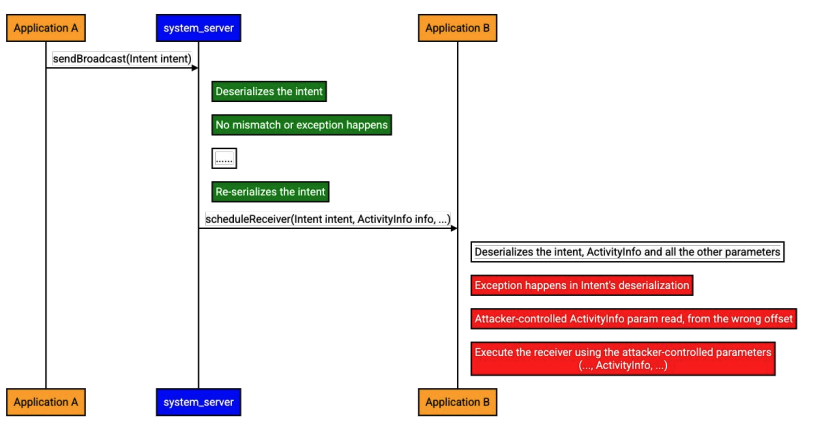
BroadcastReceiver (广播接收器) 是Android APP的四大组件之一,APP可以通过在AndroidManifest.xml文件中添加一条<receiver>的声明来完成组件的声明,其他APP通过构造一个Intent并通过sendBroadcast 方法即可访问到目标BroadcastReceiver。以上属于是Android开发者最基础的知识了,下面要重点关注 system_server具体是如何拉起一个BroadcastReceiver组件的。

system_server会通过Intent中的Action等信息找到对应进程的ApplicationThread 并调用其 scheduleReceiver 方法,跨进程通信的部分当然是通过Binder来完成的,下面是方法的实现代码以及在Binder中传输的代码部分:

1
2
3
4
5
6
7
8
9
10
11
12
13
14
15
16
17
18
19
20
21
22
23
24
25
26
27
28
29
30
31
32
33
34
35
36
37
// android.app.ActivityThread$ApplicationThread
@Override // android.app.IApplicationThread
public final void scheduleReceiver(Intent intent, ActivityInfo info, CompatibilityInfo compatInfo, int resultCode, String data, Bundle extras, boolean sync, int sendingUser, int processState) {
ActivityThread.this.updateProcessState(processState, false);
ReceiverData r = new ReceiverData(intent, resultCode, data, extras, sync, false, ActivityThread.this.mAppThread.asBinder(), sendingUser);
r.info = info; // this
r.compatInfo = compatInfo;
ActivityThread.this.sendMessage(113, r);
}

// android.app.IApplicationThread.Stub.onTransact(...)
case 1:
data.enforceInterface(DESCRIPTOR);
if (data.readInt() != 0) {
_arg0 = Intent.CREATOR.createFromParcel(data);
} else {
_arg0 = null;
}
if (data.readInt() != 0) {
_arg1 = ActivityInfo.CREATOR.createFromParcel(data);
} else {
_arg1 = null;
}
if (data.readInt() != 0) {
_arg2 = CompatibilityInfo.CREATOR.createFromParcel(data);
} else {
_arg2 = null;
}
int _arg35 = data.readInt();
String _arg46 = data.readString();
if (data.readInt() != 0) {
_arg5 = Bundle.CREATOR.createFromParcel(data);
} else {
_arg5 = null;
}
scheduleReceiver(_arg0, _arg1, _arg2, _arg35, _arg46, _arg5, data.readInt() != 0, data.readInt(), data.readInt());
return true;

首先,关注下跨进程调用onTranscat方法处理过程,需要跨进程传递的参数都会被放到同一个Parcel对象中,按顺序依次读取(使用AIDL自动生成的一般都会是按顺序的),解析完成后再去调用对应的方法,这并不是针对scheduleRecevier 是这样处理的,实际上绝大多数的Binder调用都是如此。

scheduleReceiver的处理流程中,我们要额外关注传入的ActivityInfo参数的作用。其首先是被赋值给了ReceiverData.info,并通过Handler转发到了ActivityThread.handleReceiver方法处理:

1
2
3
4
5
6
7
8
9
10
11
// android.app.ActivityThread.handleReceiver(...)
public void handleReceiver(ReceiverData data) {
unscheduleGcIdler();
String component = data.intent.getComponent().getClassName();
LoadedApk packageInfo = getPackageInfoNoCheck(data.info.applicationInfo, data.compatInfo);
IActivityManager mgr = ActivityManager.getService();
...
BroadcastReceiver receiver = packageInfo.getAppFactory().instantiateReceiver(cl, data.info.name, data.intent);
...
    receiver.onReceive(context.getReceiverRestrictedContext(), data.intent);
}

调用getPackageInfoNoCheck方法拿到packageInfo,并在其中获取到需要拉起的receiver对象调用其onReceive方法来完成BroadcastReceiver组件的启动,下面继续深入看下packageInfo对象的获取过程:

1
2
3
4
5
6
7
8
9
10
11
12
13
14
15
16
17
18
19
20
21
22
23
24
25
26
27
28
29
30
31
32
33
34
35
36
37
38
39
40
41
42
43
44
public final LoadedApk getPackageInfoNoCheck(ApplicationInfo ai, CompatibilityInfo compatInfo) {
return getPackageInfo(ai, compatInfo, null, false, true, false);
}
private LoadedApk getPackageInfo(ApplicationInfo aInfo, CompatibilityInfo compatInfo, ClassLoader baseLoader, boolean securityViolation, boolean includeCode, boolean registerPackage) {
WeakReference<LoadedApk> ref;
boolean differentUser = UserHandle.myUserId() != UserHandle.getUserId(aInfo.uid);
synchronized (this.mResourcesManager) {
...
LoadedApk packageInfo = ref != null ? ref.get() : null;
if (packageInfo != null) {
if (!isLoadedApkResourceDirsUpToDate(packageInfo, aInfo)) {
List<String> oldPaths = new ArrayList<>();
LoadedApk.makePaths(this, aInfo, oldPaths);
packageInfo.updateApplicationInfo(aInfo, oldPaths);
}
return packageInfo;
}
LoadedApk packageInfo2 = new LoadedApk(this, aInfo, compatInfo, baseLoader, securityViolation, includeCode && (aInfo.flags & 4) != 0, registerPackage);
...
return packageInfo2;
}
}
// android.app.LoadedApk.setApplicationInfo(ApplicationInfo) void
private void setApplicationInfo(ApplicationInfo aInfo) {
int myUid = Process.myUid();
ApplicationInfo aInfo2 = adjustNativeLibraryPaths(aInfo);
this.mApplicationInfo = aInfo2;
this.mAppDir = aInfo2.sourceDir;
this.mResDir = aInfo2.uid == myUid ? aInfo2.sourceDir : aInfo2.publicSourceDir;
this.mLegacyOverlayDirs = aInfo2.resourceDirs;
this.mOverlayPaths = aInfo2.overlayPaths;
this.mDataDir = aInfo2.dataDir;
this.mLibDir = aInfo2.nativeLibraryDir;
this.mDataDirFile = FileUtils.newFileOrNull(aInfo2.dataDir);
this.mDeviceProtectedDataDirFile = FileUtils.newFileOrNull(aInfo2.deviceProtectedDataDir);
this.mCredentialProtectedDataDirFile = FileUtils.newFileOrNull(aInfo2.credentialProtectedDataDir);
this.mSplitNames = aInfo2.splitNames;
this.mSplitAppDirs = aInfo2.splitSourceDirs;
this.mSplitResDirs = aInfo2.uid == myUid ? aInfo2.splitSourceDirs : aInfo2.splitPublicSourceDirs;
this.mSplitClassLoaderNames = aInfo2.splitClassLoaderNames;
if (aInfo2.requestsIsolatedSplitLoading() && !ArrayUtils.isEmpty(this.mSplitNames)) {
this.mSplitLoader = new SplitDependencyLoaderImpl(aInfo2.splitDependencies);
}
}

最终通过外部传入的ApplicationInfo对象是一个十分关键的参数,它直接决定着目标进程的dex/lib文件的加载路径。

让我们尝试将前面的信息串联起来,并尝试找到一条可以劫持目标APP dex/lib文件的攻击方案。攻击者(Attacker)可以通过发送一个Intent来唤起被害者(Victim)注册的BroadcastReceiver组件,并在Intent中夹杂一个Parcel Mismatch的对象使得system_server 与 Victim APP解析到不同的结果。由于Victim APP通过同一个Parcel对象顺序读取Intent参数以及ActivityInfo参数,因此,攻击者可以通过精致的布局实现将本该读取到Intent对象中的内容覆盖到ActivityInfo.applicationInfo.sourceDir中,实现对Victim APP加载DEX路径的劫持。(如下图所示)

image-1.png

使用Parcel Mismatch布局Intent

在笔者的理解角度,ReparcelBug2的精髓就在于劫持思路上。然而作者michalbednarski展示的布局令人叹为观止,十分值得记录学习一下。

首先是产生Parcel Mismatch解析的CVE-2021-0928:

1
2
3
4
5
6
7
8
9
10
11
12
13
14
15
16
17
18
19
// android.hardware.camera2.params.OutputConfiguration
public static final Parcelable.Creator<OutputConfiguration> CREATOR = new Parcelable.Creator<OutputConfiguration>() { // from class: android.hardware.camera2.params.OutputConfiguration.1
/* JADX WARN: Can't rename method to resolve collision */
@Override // android.p007os.Parcelable.Creator
public OutputConfiguration createFromParcel(Parcel source) {
try {
return new OutputConfiguration(source);
} catch (Exception e) {
Log.e(OutputConfiguration.TAG, "Exception creating OutputConfiguration from parcel", e);
return null;
}
}

/* JADX WARN: Can't rename method to resolve collision */
@Override // android.p007os.Parcelable.Creator
public OutputConfiguration[] newArray(int size) {
return new OutputConfiguration[size];
}
};

createFromParcel方法中加入了try-catch来”避免”Parcel解析异常而导致的进程崩溃,然而,这会让Parcel在原本需要抛出异常的位置继续读取,原本应当用于构造漏洞对象OutputConfiguration的数据被填充进入了其他对象中。

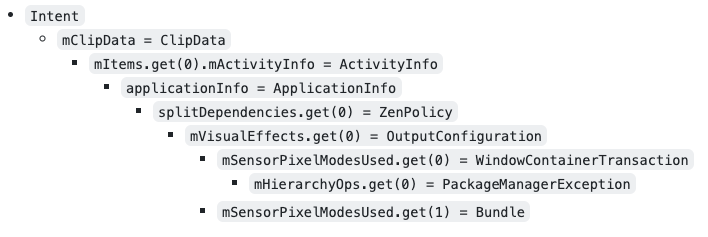
完成利用所需要解决的第一个问题是,如何将这个Parcel Mismatch的对象写入到Intent中。看似简单的Intent由于内部有许多Parcelable属性并且相互嵌套,作者找到了这样一条可利用的属性Intent.mClipData.mItems.get(0).mActivityInfo.applicationInfo.splitDependencies

1
2
// android.content.pm.ApplicationInfo
this.splitDependencies = source.readSparseArray(null);

由于Java Type Erasure机制的存在SparseArray中可以被存放任意类型的对象,包括含有Parcel Mismatch的对象

下面的问题是如何才能构造一个可被利用的OutputConfiguration 漏洞对象,这里有以下几个标准:

  1. 保证在目标进程中会触发解析异常,而不会在system_server中触发异常解析;

  2. 保证触发解析异常之后,会被try-catch机制捕获,并继续完成生于Parcel的解析;

1
2
3
4
5
6
7
8
9
10
11
12
private OutputConfiguration(Parcel source) {
ArrayList<Surface> surfaces = new ArrayList<>();
source.readTypedList(surfaces, Surface.CREATOR);
String physicalCameraId = source.readString();
isMultiResolutionOutput = source.readInt() != 1 ? false : isMultiResolutionOutput;
ArrayList<Integer> sensorPixelModesUsed = new ArrayList<>();
source.readList(sensorPixelModesUsed, Integer.class.getClassLoader()); // 可以被劫持的字段; 但需要保证抛出的异常会被OutputConfiguration的try-catch捕获
...
this.mPhysicalCameraId = physicalCameraId;
this.mIsMultiResolution = isMultiResolutionOutput;
this.mSensorPixelModesUsed = sensorPixelModesUsed;
}

于是有了如下的布局:(这里不是笔者没想明白故意省略布局思路,而是文笔菜鸡实在想不出如何能简明扼要的表达清楚…..)

image-2.png

目标APP在解析OutputConfiguration.mSensorPixelModesUsed.get(0)会抛出异常,则OutputConfiguration.mSensorPixelModesUsed.get(1)就会被用于覆盖后续的参数了,为方便布局在这里存放了一个Bundle。写入Bundle会导致多处三次Parcel.writeInt (Bundle tag, Bundle length, Bundle MAGIC), 因此作者有找到了一个ZenPolicy CREATOR

来消耗者三次Parcel.writeInt,最终的布局如下:

image-3.png

Android 13 中的缓解方案

通过对ReplaceBug2的攻击流程梳理会发现,在上一篇blog中提到的Android 13引入的LazyBundle机制完全不能抵御这种攻击方式,因此,为解决ReplaceBug2类型的攻击,Android 13中引入了其他的Safer Parcel机制。

首先,总结攻击流程可发现攻击者会选取一些Parcelable对象的Array/List等属性向其中塞入携带ParcelMismatch的漏洞对象。前文也提到了由于Java Type Erasure机制的存在,这些属性普遍会缺少类型校验。既然如此,那么在Android 13中便加入了对类型信息的校验:

1
2
3
4
5
6
7
8
9
10
11
12
13
14
15
16
17
18
19
20
21
22
// from android.os.Parcel
    @SuppressLint({"ArrayReturn", "NullableCollection"})
@Nullable
public <T> T[] readArray(@Nullable ClassLoader loader, @NonNull Class<T> clazz) {
Objects.requireNonNull(clazz);
return readArrayInternal(loader, clazz);
}

    @SuppressLint({"ConcreteCollection", "NullableCollection"})
@Nullable
public <T> ArrayList<T> readArrayList(@Nullable ClassLoader loader,
@NonNull Class<? extends T> clazz) {
Objects.requireNonNull(clazz);
return readArrayListInternal(loader, clazz);
}

@Nullable
public <T> SparseArray<T> readSparseArray(@Nullable ClassLoader loader,
@NonNull Class<? extends T> clazz) {
Objects.requireNonNull(clazz);
return readSparseArrayInternal(loader, clazz);
}

其次,利用ReplaceBug2类似方案的完成的利用,很难保证Parcel对象中内容被完全读取殆尽,如下图所示:

image-4.png

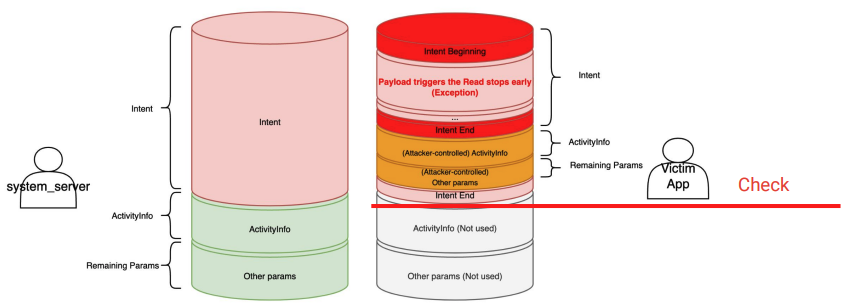
在Parcel对象中,添加了如下的方法用于检查Parcel中的内容是否被消费完毕,通过抛出异常的方式来阻断攻击者的利用链,这个方法可以被用于Binder.onTranscate中检查

1
2
3
4
5
6
7
8
9
10
11
12
/**
* Verify there are no bytes left to be read on the Parcel.
*
* @throws BadParcelableException If the current position hasn't reached the end of the Parcel.
* When used over binder, this exception should propagate to the caller.
*/
public void enforceNoDataAvail() {
final int n = dataAvail();
if (n > 0) {
throw new BadParcelableException("Parcel data not fully consumed, unread size: " + n);
}
}

Insight

至此,Android 12之前常见的两种Parcel Mismatch利用方式以及修复方案都总结完毕了。可以看到Android 13的Safer Parcel改造工作确实有效的增强了Parcel的安全性,阻断了利用链;但是这仍不能保证开发者不会开发出带有Parcel Mismatch问题的类出现,并且ReplaceBug2提出了一种更具有挑战性的漏洞利用思路出来,在Android 13被广泛普及之前,该类型的问题仍有很多潜在的价值等待挖掘哇。吾辈仍需不断努力。

REFERENCE